


First, let’s bust a few myths.
If you Google ‘what’s needed for deep learning,’ you’ll find plenty of advice that says vast swathes of labeled data (say, millions of images with annotated sections) are an absolute must.
You’ll probably also read that it takes a lot of computer power. Then, there’s the small ask of having a Ph.D. in Maths; or a background in computer science, at least. You may well come away thinking, deep learning is for ‘superhumans only’ — superhumans with supercomputers.
But the reality is much less stark. Deep learning can be for everyone. If you think we’re crazy, give us a few minutes of your time, and we will attempt to show you otherwise.
| See also: Why Deep Learning May Not Be the Right Solution for Your Business |
The revelation
In this article, we’ll discuss why deep learning doesn’t need much beyond the norm.
In fact, we’ll show you how it really can be for everyone. So if you, like many of us, don’t have a maths Ph.D. — or don’t have access to a super-fast computer — and you would still like to explore the field, then this article is for you.
Yes, deep learning requires some understanding of programming (you’ll have to use Python). However, we’ll give you a step-by-step explanation of what’s going on in the code, while keeping things understandable, so there’s no need to worry if you haven’t used Python before.
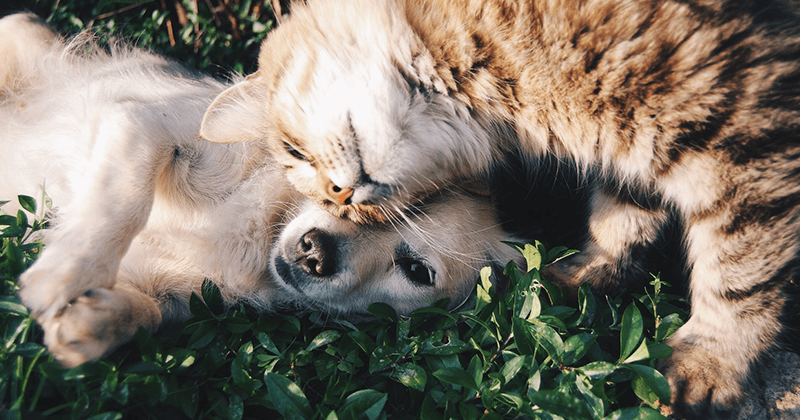
To get you started, we’ll show you how to train a computer to classify pictures of cats and dogs (this is a classic example of how one might use deep learning and computer vision). And we’ll even take things a level further.
Our model won’t only recognize cats versus dogs, but it will also know the difference between different breeds of cats and dogs. Sounds interesting?
…Let’s get to it.
The deep learning toolkit
For this task, we’ll use cutting-edge, but soon-to-be readily-available software. At the time of writing, the ‘fastai library v2’ is in pre-release. That said, the MOOC will become publicly available around July 2020.
——
(Note: If you’re reading this article before the release date, use ‘fastai2’ — in place of ‘fastai’ — on import, as described in the code below.)
——
‘Fastai’ is an open-source, modern deep learning library. It sits on top of PyTorch. Alongside ‘fastai,’ we will use a computer with a graphics processing unit (GPU) so that we can get results as quickly as possible.
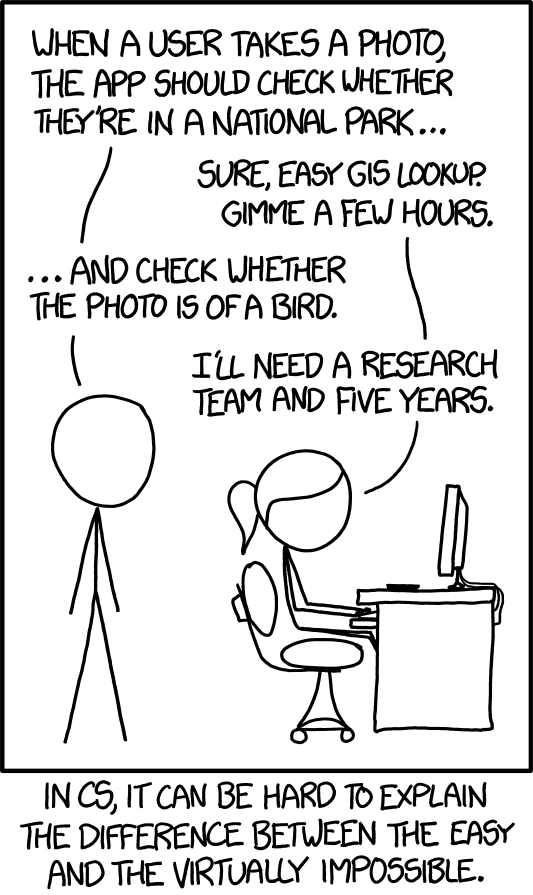
Source: https://xkcd.com/1425/
Now, let’s be clear. This task is not easy. Just ten years ago, few computers could have completed it. However, it is now possible thanks to the hard work of the many people who have advanced the hardware and software we’ll use today.
These are the kind of toolkits that make deep learning accessible to all.
Let’s get to it!
Right, it’s time to get stuck in.
Let’s train an image classifier to recognize breeds of cats and dogs. This model should achieve close to maximum possible accuracy within a couple of minutes of training it on a single GPU.
A quick heads up: we will not be using the PEP8 coding style. Throughout this article, we decided to follow the ‘fastai’ style, which you can read more about here. Why not use PEP8? Let’s let Jeremy, the library’s creator, answer that question:
“I don’t think it’s ideal for the style of programming that we use, or for math-heavy code. If you’ve never used anything except PEP 8, here’s a chance to experiment and learn something new!”
The following code is everything you need to perform the task:
from fastai.vision.all import *
path = untar_data(URLs.PETS)
dls = ImageDataLoaders.from_name_re(path=path,
fnames=get_image_files(path/’images’),
pat=r'(.+)_\d+.jpg$’,
valid_pct=0.2, seed=42,
item_tfms=Resize(224))
learn = cnn_learner(dls, resnet34, metrics=error_rate)
learn.fine_tune(4)
Going one step further, these are the three tasks performed, once the code executes:
- Download and extract a dataset containing seven thousand images of cats and dogs, which includes 37 different breeds.
- Download a pre-trained model from the internet: the model was trained on a much larger dataset, called ImageNet, which contains more than one million images.
- Fine-tune the model using transfer learning, and other deep learning techniques, to create a model that’s customized to recognize the 37 breeds of cat and dog.
Now, let’s look at what each line of code actually does.
- from fastai.vision.all import *This line of code imports the fastai library that we’ll use, as well as all dependencies. We are importing *, which is not generally recommended in software engineering best practices. However, in the case of the fastai library — which is designed specifically for use in Jupyter Notebooks and other read-eval-print loop (REPL) environments — it’s able to avoid polluting the namespace and makes all necessary ‘tools’ available for the user to use. So, we’re happy to import using ‘*’ in this instance.
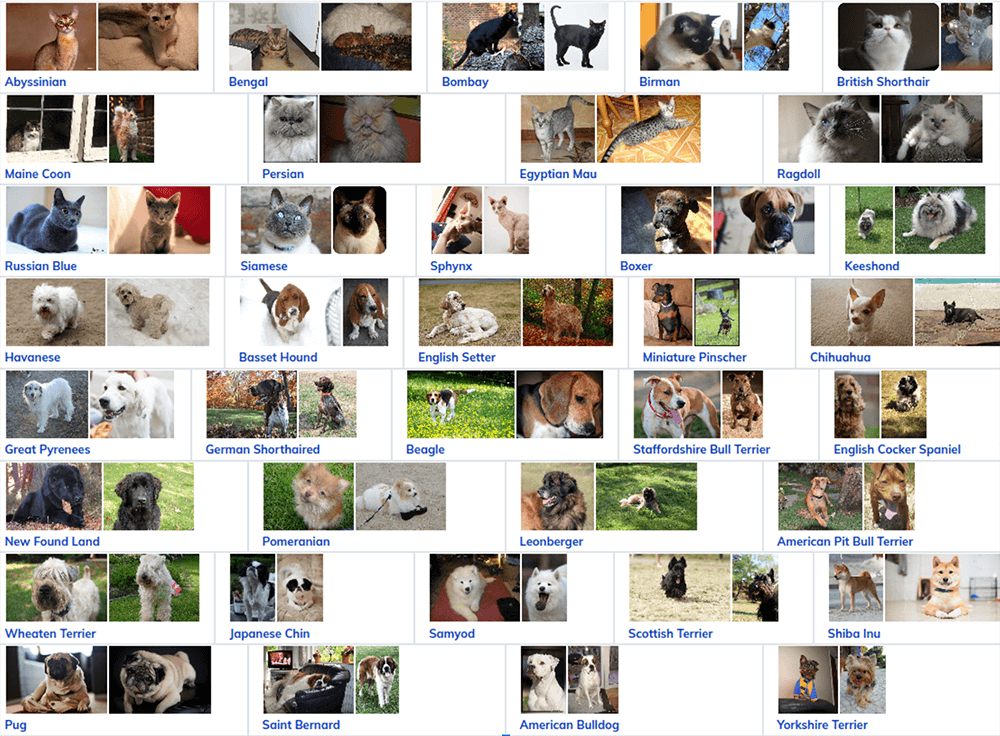
- path = untar_data(URLs.PETS)This code downloads the standard pets dataset from the internet. Then, extracts it and returns a path to the location. The Oxford III-T Pet dataset contains 37 categories of different cat and dog breeds: there are roughly 200 images for each class, meaning 7,348 images in total. Here are the 37 classes, taken from Oxford University, with examples of each class:
- dls = ImageDataLoaders.from_name_re(…)Here, the code creates a DataLoaders object, which represents a combination of training and validation data: this stops the mistake of not creating a validation set. In this example, we:
- Provide a path to the downloaded and extracted data with path argument.
- Get all file names from the provided path using get_image_files method
- Extract labels from file names using a regular expression that matches the format of the pets dataset and passes it to the pat argument
- Set the validation set to 20% of the full dataset; for experiment reproducibility, we set seed so that every time we run this experiment, the split to validation and training sets remains the same
- Resize all images to the same size — square shape of 224 pixels — as to train quickly using a GPU, all the images must be the same size (we used the built-in resize method). After defining a DataLoaders object, we can easily look at the data with a helper function:
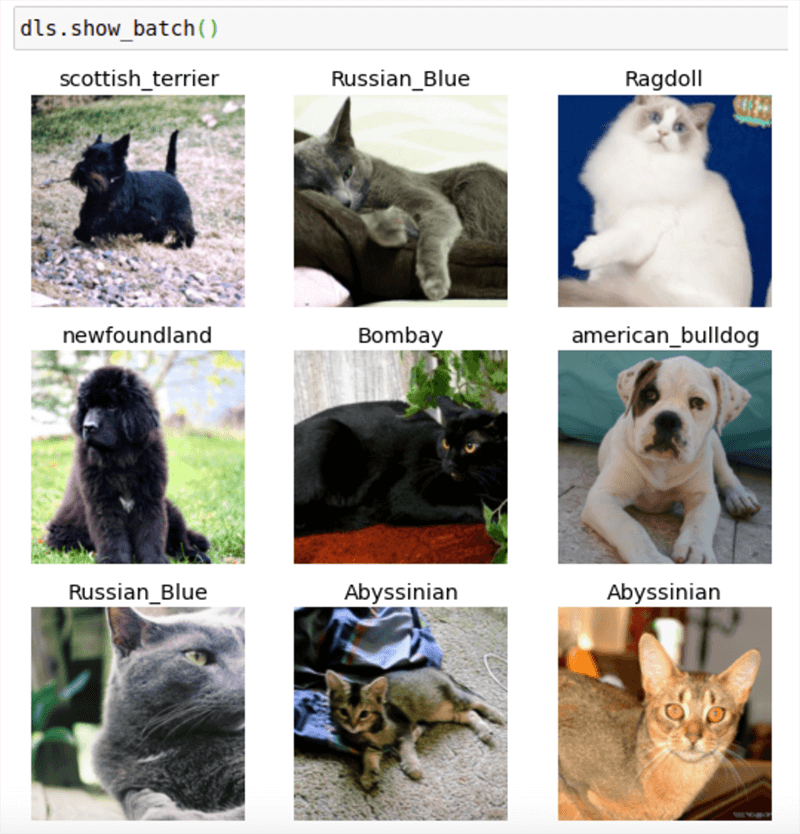
This function displays a grid of example training images with assigned labels. This is a sample of our training data. Some images may be transformed randomly as we selected to use data augmentation. With data augmentation, images can be randomly cropped, squished, resized, flipped, rotated, have brightness changed, etc.
- learn = cnn_learner (dls , resnet34 , metrics=error_rate)The fourth line of code creates a Learner: an abstraction connecting a model, an optimizer, and the data to train it on — and automatically chooses an appropriate loss function. For this example the learner, we will:
- Automatically download an ImageNet pretrained model
- Remove the classification head of the model
- Replace it with a head appropriate for this particular dataset
- Set appropriate defaults for the optimizer, weight decay, learning rate, and other hyperparameters (users can override the defaults as well)
- learn.fine_tune(4)
The fifth line fine-tunes the model using the 1-cycle policy: a recent best practice for training neural networks. There are a lot of things happening here:- Annealing both learning rates and momentums
- Printing metrics on the validation set
- Displaying results in an HTML or console table
- Recording losses and metrics after every batch
- A GPU will be used if available: it will first train the head for one epoch while the body of the model is frozen, then fine-tune as many epochs given (there are four here), using discriminative learning rates.
Below is the training stats output.
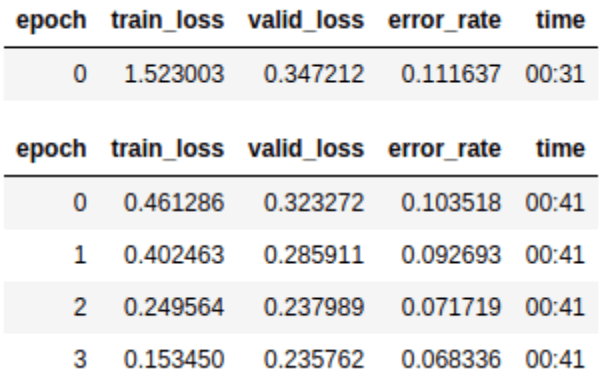
As you can see, we can train a model pretty quickly (in less than 5 minutes) on a single computer with a GPU. Typically, we can get a GPU for free.
Once a Learner has been trained, we can see the classification error rate on the validation dataset alongside the training and validation losses. We can also visualize the results, using the following helper function:
- learn.show_resutls()

The Show_resutls method returns a grid of random validation pictures with predicted classes and ground truths. The prediction is green when it’s the same as ground truth and red if not. It uses the data and the model type to display the correct outcome. To inspect the results more systematically, we can use another method within the library ClassificationInterpretation.from_learner.We can use it to compare the ground truth (actual) labels with the labels predicted by the model.
-
- interp = ClassificationInterpretation.from_learner(learn)
-
- interp.plot_confusion_matrix(figsize=(12,12), dpi=60)<
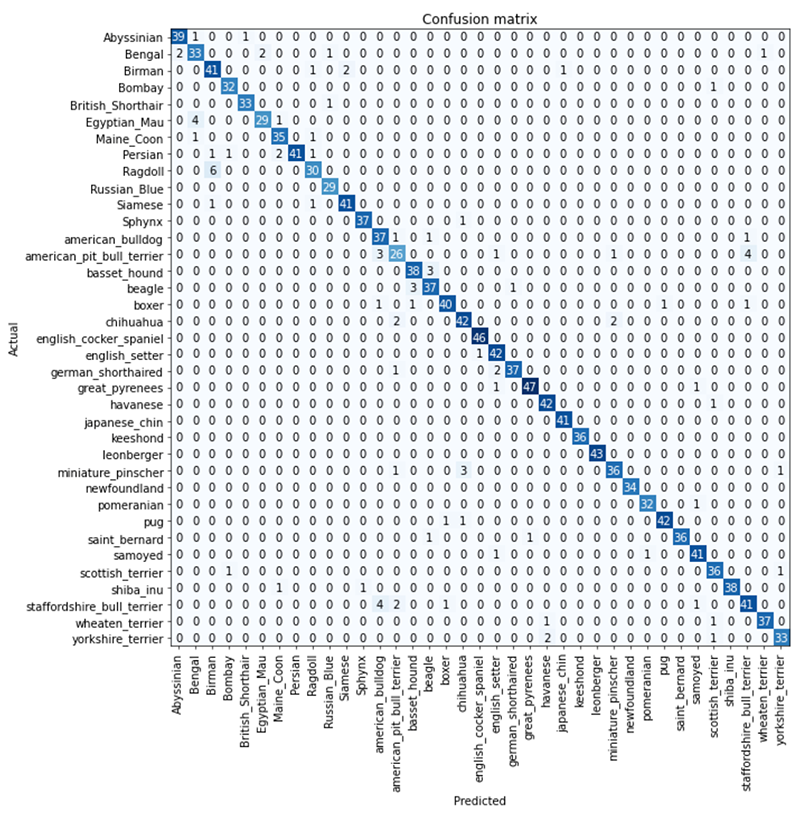
As you can see from the above graph, the model is right most of the time — with just a couple of wrong classification in the validation dataset. To deep-dive into the wrong predictions but with high confidence — or to correct prediction but with low confidence — we can use another fastai function plot_top_loses
- interp.plot_confusion_matrix(figsize=(12,12), dpi=60)<
- interp.plot_top_losses(5, nrows=5)
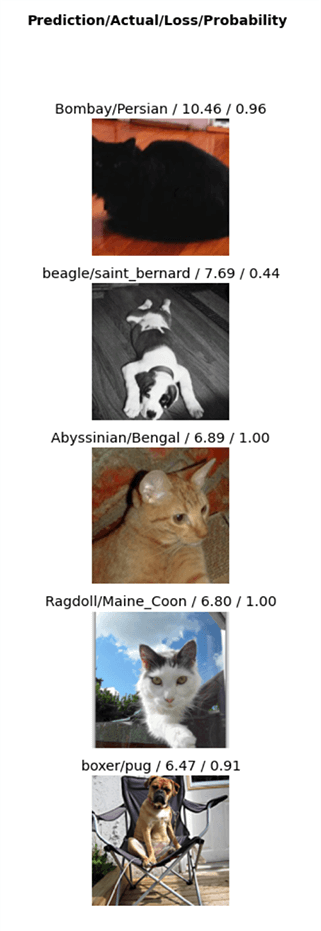
As you can see in the top picture, the actual breed is Persian, yet the model predicted it as Bombay with a probability of 0.96 (the closer the number to 1, the more confident the model about the prediction).In this case, the model was confident about prediction, but it got it wrong — this type of analysis can help us improve the model further.
How to deploy the model
Once the model is trained, we can deploy it as a web application and make it available for others to use. Although fastai is mostly focused on model training, you can easily export the PyTorch model to use it in production with the command Learner.export
The library provides two methods to evaluate the model on user-uploaded images:
- Learner.predict for single images
- Learner.get_preds for batches of images
Jupyter Notebook, Voila, and ipywidgets offer an easy way to create web applications for machine learning projects. Using binder (mybinder.org), we can also deploy an app to share with a team, for example.
Click here for an example of a very simple app created to classify images to one of the 37 pets breeds (note: it takes a while to launch the app as it first creates the environment, then serves the app).
***
Now you know how to apply deep learning to image classification. But how much do you know about deep learning in general? If you have one more minute to spare, let’s take a quick look at its history and theory.
The history of deep learning
Deep learning stems from research into neural networks, which were inspired by how the human brain works.
This dates back to the 1940s.
Back then, researchers were starting to investigate the theory and practice behind deep learning. However, it wasn’t until the 1980s that researchers started adding layers to neural networks — thus, making them ‘deep.’
And this is the field we’ve come to call deep learning.
Deep learning is a subset of machine learning. Machine learning is like regular programming: a way to get a computer to perform a specific task — say, ‘to recognize cats and dogs,’ as we covered in this article.
But it would be extremely difficult to use standard computer code to complete a task like that, which is why machine learning doesn’t tell a computer what steps to take.
Instead, we train an algorithm on how to solve a problem using examples so that it can figure out how to solve the problem itself — and most crucially of all, neural networks are flexible enough to solve any given problem using this method.
What can neural networks do today?
Neural networks are used in all sorts of modern-day applications. And deep learning is one of the best-known approaches. In many areas, it’s as good — if not better — than human performance.
Deep Learning is here, it’s real, and it’s widely used across the following fields:
- Computer Vision
- Image classification
- Segmentation
- Object detection
- Image generation
- Natural language processing and understanding
- Medicine
- Biology
- Tabular data
- Recommendation systems
- Playing games
- Robotics
- …and many more
Limitations of machine learning
All said, deep learning can’t solve every problem.
The technology may seem magical at times. But there are limitations to what even state-of-the-art machine learning algorithms can do.
First, a model can only learn to recognize patterns that are present in the training dataset we share. In our example, we trained our model to identify photos of cats and dogs, so our model can classify photos of cats and dots. But it wouldn’t be able to recognize drawings, for example — or anything other than photos, for that matter
Training an algorithm also needs correctly labeled data, also known as the ‘ground truth’ — in our case, that means classifying each picture either as a breed of cat or dog.
See also: Machine Learning: Off-the-shelf models or custom build – pros and cons
Round-up: The software we used
The example used in this article was possible thanks to the fastai library, and its associated book and Deep Learning course, which will be publicly available around July 2020: these resources include examples of how to build and deploy state-of-the-art deep learning image classifiers.
Fastai is a project led by the Fast.ai team (Howard et al.). It is built on top of PyTorch, and it’s primarily designed for interactive development with notebook-oriented development systems, like Jupyter Notebook.
The mission of the Fast.ai team is to provide:
- Practitioners with high-level components that can quickly and easily provide state-of-the-art results in standard deep learning domains
- Researchers with low-level components that can be mixed and matched to build new applications
Additionally, we used a GPU deep learning server, run on Linux.
There are plenty of options to access a computer that already has everything set up and ready to use: some options are free, like Google Colab, Paperspace, or Kaggle Notebooks; others are paid, but cost as little as US$0.25 per hour.
If you use a paid option, remember to shut down your instance to avoid paying for it when you don’t need it (note: shutting down your browser or local computer is not enough!).
And there you have it — do you still think we’re crazy? We hope not 🙂
References: